
You may have come across instances where you have to utilize container images from a shared private container registry for your Kubernetes cluster. It being private, it’s always a must to provide the required authentication credentials for your cluster to talk to the registry. In GCP, this is fairly simple and hassle-free. Let’s look at the simple setup below.

In this setup, we have 3 projects namely Project A, Project B, and Project C. Let’s assume that your development environment is running on Project B and the production environment in Project C. Project A is where you have your container registry which is shared among the projects. And the requirement is to have the limited access configured for both the environments where they can pull the required container image at their runtime. Let’s look into the simplest way we can have this configured using the cloud shell.
Prerequisites
- Two GCP projects with a valid billing account linked to them. See the official documentation on creating a project through gcloud to see how it is done.
I have created two configurations to make it easy to switch between the projects which you will see in the below steps. Check the official documentation on using the gcloud config configurations command to see how you can create your own. As mentioned previously, Project A will be the project with the shared container registry and in Project B and C, we will have a GKE cluster running our workload using the images in the shared container registry.
Setting up the container registry in the Project A
To use the container registry, the first thing you need to do is enabling the relevant API. Once you do that, you can start working with your registry and the images you keep in it will utilize a Google Storage Bucket for storage. We can use the command gcloud services enable <service-name> to enable the API as shown below.
#List and grep the required API
gcloud services list | grep containerregistry

#Enable Container Registry API
gcloud services enable containerregistry.googleapis.com
Once you have the API enabled we can use docker to pull, tag, and push our container images into it. The registries in the container registry are identified by the host and the project ID. As for this setup, the container registry can be identified as “gcr.io/project-a-325718/<IMAGE>:<IMAGE-TAG>”. You can read more on that from the official documentation. So, let’s tag a copy of a container image from the docker hub to our private container registry in Project A. We will be using the busybox image in this setup as below.
#Pull the busybox image
docker pull busybox

#Tag the image
docker tag busybox:latest gcr.io/project-a-325718/my-repository/busybox:latest

#Push the tagged image to our private registry
docker push gcr.io/project-a-325718/my-repository/busybox:latest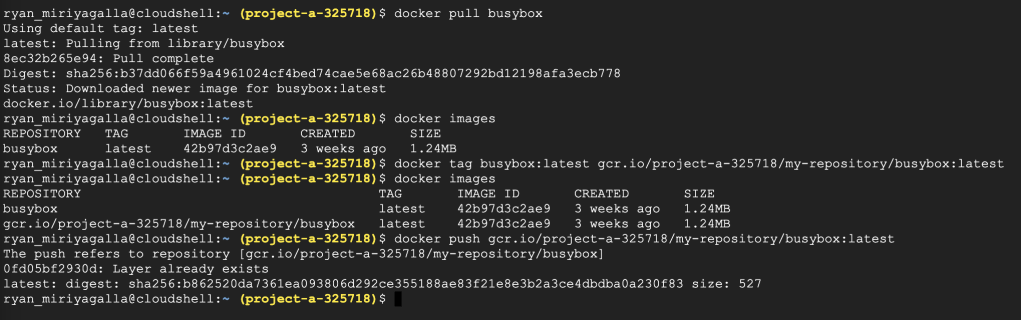
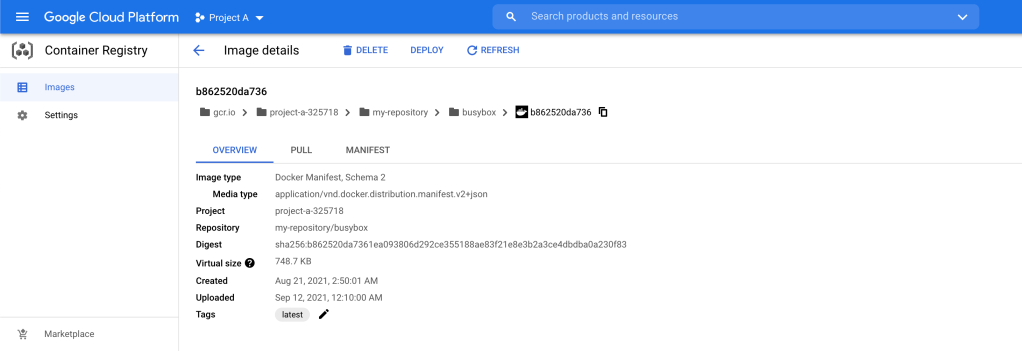
As you can see in the below screenshot, now we have the latest busybox image in our private repository in Project A.
Setting up the GKE cluster in the Project B
Just as in the previous step, the first thing we need to do is enabling the required APIs in the project. Here we will be creating a Google Kubernetes Engine (GKE) Cluster.
#List and grep the required API
gcloud services list | grep container

#Enable Kubernetes Engine API
gcloud services enable container.googleapis.com
Once we have the API enabled, we can go ahead and create our GKE cluster. In this setup, I will be creating a cluster that has a single preemtible node in the node pool. Once we have the cluster, we will be using the command gcloud container clusters get-credentials to have our cluster-admin credentials in the working cloud-shell to interact with our Kubernetes cluster. See the official documentation for more information on generating the .kubeconfig file with your credentials using the gcloud.
#Create the Kubernetes Engine Cluster
gcloud container clusters create my-gke-cluster --num-nodes 1 --preemptible --zone us-west1-c
Now we have a running Kubernetes cluster in our Project B. Let’s go ahead and test out our permissions inside the cluster.
Setting the right permissions to access the private registry in Project A
We should not face any issues working with the container images from the docker hub since they maintain a public repository. We can simply go ahead and use images from the docker hub to create our containers as shown below.
#Create a Pod with the busybox image from the docker hub
kubectl run pod-with-docker-hub-image --image=busybox -- sh -c 'sleep 2500'

#Describe Pod status
kubectl describe pod pod-with-docker-hub-image

But, since Project A (where we have our private container registry) and Project B (where we have our GKE cluster) are two separate projects with no link between them, the containers in Project B will need special permissions to use the container images from Project A. Let’s go ahead and try to create a container using our busybox image we pushed to the container registry in Project A and see what happens.
#Create a Pod with the busybox image from the private repository in Project A
kubectl run pod-with-project-a-gcr-image --image=gcr.io/project-a-325718/my-repository/busybox:latest -- sh -c 'sleep 2500'

#Describe Pod status
kubectl describe pod pod-with-project-a-gcr-image

It fails as Project B does not have permissions to the container registry in Project A to pull the image we have defined. The recommended way to configure authentication to use a private container registry is to create a docker-registry type secret object in the cluster and define the imagePullSecret in our definition file to use the given authentication details to pull the image. This way is correct and you can see how it is done in the Kubernetes official documentation.
However, in GCP, you don’t need to go through this path since this can be achieved using the IAM policies and service-accounts.
A service-account is an identity (also a resource) that can be used to run API requests on behalf of your resources connected to it. Read more about GCP service-accounts in the official documentation. When we created the GKE cluster in the previous step, it created a node pool with a VM instance in it. This is just as a regular VM instance in the compute engine and it is created with a default service-account attached to it. You can see the service-account attached with your instance as shown below. We are going to note this down in a separate sheet since we will be using this service-account name in the future steps.
#List nodes in the Kubernetes Cluster
kubectl get nodes

#List GCP VM instances in the project
gcloud compute instances list

#Describe the VM instance and grep the service-account
gcloud compute instances describe gke-my-gke-cluster-default-pool-e7150e10-0pdg --zone us-west1-c | grep -B1 serviceaccount

#List the service-accounts in the project
gcloud iam service-accounts list
You can also go to your GKE cluster and see the service-account associated with your node pool using the cloud console.

Let’s switch back to Project A, where we have our private container registry and see the set of permissions and the identities associated with it. We can use the command gcloud projects get-iam-policy <PROJECT-ID>.
#Get the iam policy in the project
gcloud projects get-iam-policy project-a-325718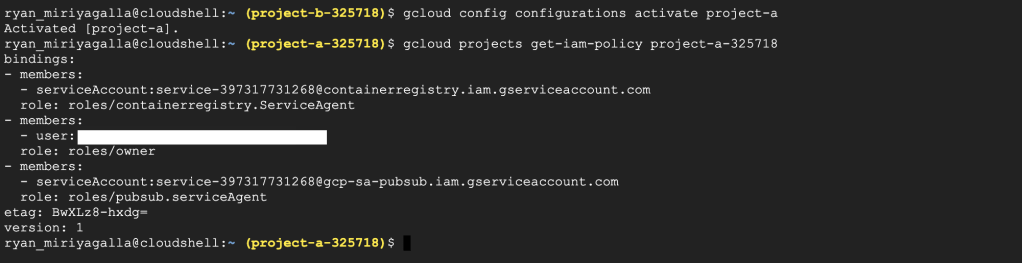
As mentioned before, Project B does not have any permission in Project A since it is a separate project. But for Project B to have permission in Project A to pull images from the container registry we can set these permissions explicitly using IAM and service-accounts.
For the nodes in the GKE cluster in Project B to access these container images, we need to give the service-account associated with the nodes the right permissions in Project A. The correct permissions to fulfill this requirement is the Storage Object Viewer (roles/storage.objectViewer) role where the read permissions are set for the objects in the storage buckets. (Container images are stored as bucket objects).
Let’s take the default service-account associated with the nodes in the GKE cluster in Project B that we noted down earlier and give it the roles/storage.objectViewer permission in Project A so it can read the bucket objects in Project A. This can be done using the command gcloud projects add-iam-policy <PROJECT-ID> –member=”<SERVICE-ACCOUNT>” –role=”<ROLE>”
#Add iam-policy-binding to the project
gcloud projects add-iam-policy-binding project-a-325718 \
--member="serviceAccount:53694601326-compute@developer.gserviceaccount.com" \
--role="roles/storage.objectViewer"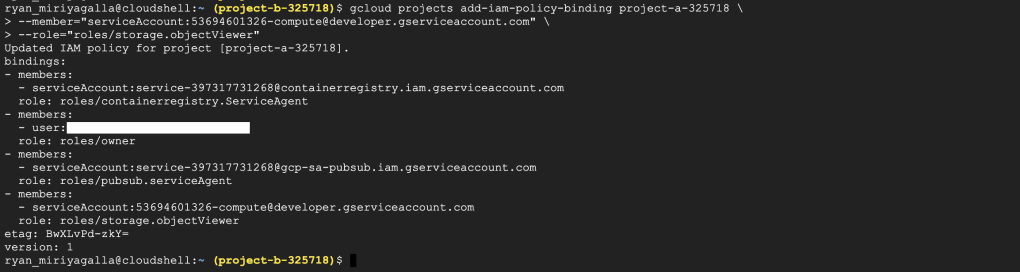
So now we have (the default service-account used by the nodes in the GKE cluster in Project B) read permissions in the objects in the Project, let’s try to create the same container again and see if it can pull the container image we have pushed to our registry in Project A.


Simple as that, now we can see that the container was successfully started with the image taken from our private container registry from Project A. We were not required to generate keys for our service-account, create a secret object from it and define an imagePullSecret. By only using IAM policies and the service-accounts we were able to link our separated project and a shared container registry in a different project. Not just Project B and C, we can follow the same procedure to multiple projects like this according to our requirements. In that case, the best approach is to create a separate service-account for this purpose and use that particular service account for our node-pool and to the iam-policy.
Summary
GCP makes it hassle-free to share your private container registry with other projects just by using IAM policies and service-accounts. To pull container images from a shared private container registry you need to give your service-account the Storage Object Viewer (roles/storage.objectViewer) permissions and if you want to push new images to a shared container registry you need to give your service-account the Storage Object Creator (roles/storage.objectCreator) permission in the project where you have your shared container registry.

Leave a comment